SaaS marketplaces are more ubiquitous than ever. They’re growing in popularity in an increasingly congested and finely stratified SaaS market. Marketplaces, as a channel, are growing in importance thanks to rising customer acquisition costs through direct channels.
Despite the commercial success and impetus behind marketplace integrations; there are precious few resources out there for technology leaders to understand how to successfully execute B2B SaaS marketplace integrations in a way that complements their product feature set.
This series of posts is an attempt to systematically capture the key tradeoffs, requirements and future-proofing strategies to help you, as a technical leader, deliver this evolving class of feature requests.
Let’s start with some basics.
Note: if you’re looking for more detail on data integration and SaaS marketplaces have a read of the next article in this series.
Get your team on the same page
Before we examine some of the deeper aspects of SaaS marketplace integrations, it’s important your team understands why these features are a priority.
Much like any other initiative, everyone involved with technical, product and project aspects should be well aligned on why SaaS marketplace integrations are being prioritised. Doing this guards against anyone viewing this work as a distraction from the core product roadmap delivery.
Leadership communications can be useful here. If commercial leaders and product managers communicate their vision and objectives in team meetings and artefacts (e.g. requirements documents), it demonstrates the importance of SaaS marketplace integrations to the whole team. A product requirement specification document (PRD) can help with this alignment. Here are some templates to help you get started:
Product integrations with a SaaS marketplace
Historically, in the age of on-premise software, internal IT teams spent a lot of effort integrating systems. With the “SaaSification” of business in all verticals, product integrations enable some of this work to happen in a uniform, well-maintained manner that avoids hacks and kludge scripting solutions.
These days, most product integrations connect two disparate SaaS platforms. Once a platform receive the right authentication and authorisation, it can exchange data via an API. Such integrations create a seamless experience for customers. SaaS marketplaces enable business admins to discover and connect these integrations to enable data flow.
Let’s assume you have a SaaS business that helps with the logistics of shipping packages.
You might consider creating product integrations with the leading e-commerce platforms (Shopify, Woocommerce etc.). The integrations would enable order information for a merchant to flow from the e-commerce platform to your SaaS app. This automatically removes triggers of customer annoyance; such as swivel chairing data inputs, incomplete dashboards, flicking between different screens, and not being able to correlate actions between different systems.
The key distinction with SaaS marketplace integrations is that they are available to all customers shared between the platforms. This has important consequences for how they need to be engineered; both from an authentication (more on that later) and UI/UX design perspective. You need to cover the most common use cases without getting stuck in a niche that might only help a single customer.
It’s also important to keep in mind that, the end customer of B2B SaaS usually represents an organisational context. They can have many users at various levels (admin, user, viewer etc) that need to be considered.
Note: If you’re looking for information on integration platforms, you can check out the The ultimate guide to integration platform as a service (iPaaS)
Authentication and authorisation
As foreshadowed above, authentication and authorisation are key ingredients for enabling B2B SaaS marketplaces. In this section we explore the basics with some discussion about common patterns deployed in the real world.
Authentication for B2B SaaS marketplace integrations
In its most simplest form, authentication establishes the user’s identity. In other words, it verifies they are who they say they are. A combination of username and password is the most common process for authenticating a user. However authentication can be extended to include:
- Sign in with ‘X’ (X being Google, Facebook, Salesforce etc)
- SSO – using the active directory of a federated resource
- Passwordless login – with magic email links (popularised by Slack)
Options 1 and 2 above are enabled by OAuth standards which, we will discuss in more depth later.
Authorisation in B2B SaaS marketplaces
Authorisation is the process of verifying a user has adequate permissions to access one, or a set of, resources.
Authentication and authorisation are related concepts. OAuth (an authorisation protocol) has made major moves to cut the number of username and password combinations an individual needs to manage. They’ve done this by allowing for identity providers to delegate authentication duties.
It is critically important for technical teams to reflect on their current authentication setup and focus on how and where to inject an authorisation flow. Customers must feel informed about what’s going on and have a contextual understanding of what they signing up for and the potential benefits they can unlock.
Teams need to keep security best security around user credentials top of mind when designing authentication processes. This is because they carry massive brand reputation and customer trust risk.
Have a look at these resources for a more in depth, have a read of this.
OAuth v2.0
Overview
B2B SaaS integrations are API led connections between two SaaS platforms that allow customers to authorise data flows between apps. The end result is that they simplify thing for users and app owners.
Before APIs can exchange data they need to establish trust. APIs can be secured and can establish trust in many different ways:
- Basic Auth
- Digest Auth
- API keys (JWT)
- NTLM authentication
- SAML
In the context of B2B SaaS marketplace integrations, one standard (or more accurately a set of standards) has become the de-facto industry standard. OAuth. In this article whenever we refer to OAuth we are referring to OAuth v2.0
OAuth is an authorisation framework. It enables SaaS applications to obtain limited time and limited user account data via a standardised set of flows.
A commonly used analogy used for OAuth is how hotel room access is controlled via access cards.
Once a hotel visitor authenticates with the front desk, the visitor receives an access card that allows them time-limited access to a single room in the hotel. Similarly, in OAuth 2.0 the user (hotel guest) authenticates with the SaaS marketplace (hotel). Then the authentication server (hotel front desk) issues the user (your SaaS app) a time limited token. The token is used to transact a certain sub-segment of the user data as agreed at the time of issue.
Technical view of oAuth
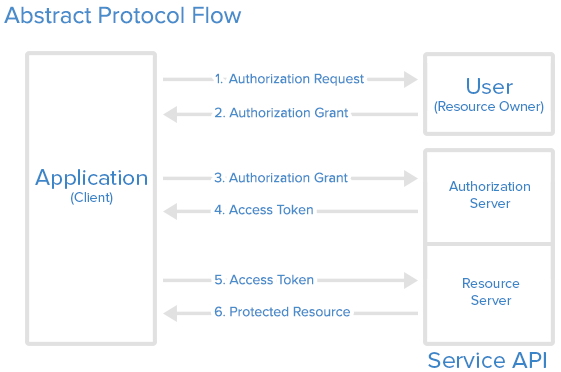
OAuth has the following roles:
- Resource Owner
A user who authorises an application to access their account. In our context the user is an admin of the SaaS marketplace - Resource and Authorisation Server
This server hosts all user accounts. It is responsible for authenticating the user and providing tokens that are limited in time and data aspects. The resource server or the API can then provide an interface for access to user data based on the presence of a token.
B2B SaaS marketplaces (MP) are resource and authentication server – API documentation sections will cover the steps here - Client
This is the application that wants to access the user’s account and must be authorised by the user. It is the SaaS application (app) being integrated.
Another concept to keep top pf mind is that of Scopes.
Scopes allows users to only provide a granular level of access rather than giving clients all or nothing access. Scopes means you can control access to certain segments or provide read or read/write access.
Now let’s work through a complete flow to demonstrate the most general interplay of elements in OAuth. Remember, there might be differences in the flow for specific SaaS marketplaces. So always refer to the relevant documentation.
The next section will tie together the OAuth theory and its real world implementation.
An abstract process flow for SaaS marketplace integrations
Terminology
- App = your SaaS application
- MP = marketplace
- User = an end user who is assumed to have relevant privileges
Flow
- Either via clicking on the “Install” button on the MP URL or “Connect” button in your app, a user triggers the first access request to the MP via a pre-determined OAuth install URL.
- User then has to authenticate and authorise for the scopes the app is asking access for. Usually done by clicking a button labeled “Authorise”.
- MP redirects the user to the an OAuth callback link in the app with an authorisation code.
- App takes the authorisation code and attaches the client secret info then posts it to the MP’s OAuth server.
- MP verifies the information sent and grants an access token, refresh token and some indication of an expiry time (usually in seconds).
- App can now access data as long as the request sent contain the access tokens in the authorisation header.
- App can periodically refresh the token using the refresh token so that user does not have to be prompted at the end of each period.
A case study example for building a B2B SaaS marketplace integration
Here is a more in-depth, real life version of the same flow. It explains the steps required to make the abstract flow a reality.
Step 1: Get access to the API
Head over to the SaaS marketplace and look for the developer or the API section. A Google search for <Brand> Developer or <Brand> API can be a useful shortcut. Most major platforms allow self service for accounts via the usual sign up flow.
Step 2: Get your credentials (aka register your app)
Based on the API documentation for the marketplace there should be a section that allows you to look up your developer profile. This should provide the authentication details you will need to store (e.g. the client id, client secret, app id etc).
In some more advanced marketplaces, you have to “create” the app, which dynamically generates the keys needed.
Other options include:
- Having to pre-register the scopes you require. This is usually via a checkbox.
- The OAuth callback URL with which the SaaS marketplace will return the tokens. For development purposes, you can select a localhost type URL. But sometimes, due to security considerations, you will need an HTTPS address. Localtunnel or other such proxies can be a life saver in this situation.
Some SaaS marketplaces also offer API key-based access for single accounts or app instances. This is true for CRM and ERP systems where contractors are engaged for custom work. In these instances you will have to take a step sideways and focus on the OAuth for relevant sections.
The steps below need to be done via your app. Alternatively you can manually walk through the flow using a toy-app, postman or something similar.
Step 3: Build your OAuth URL
This is some combination of the Client ID, App ID and Scopes along with the redirect URL. Unfortunately there is no standard for structuring the URL. And requirements tend to vary between marketplaces.
Some tips to help you with this seemingly simple task:
- Don’t forget to URI encode your details with special characters in the client secret. Do this because there is the potential for them to get mangled when sent over the wire.
- The redirect URL must match the exact URL in the previous stage or you might run into an error.
Step 4: Pull the authorisation code from OAuth callback
Once the user authenticates, your app’s registered OAuth callback URL will receive an authorisation code sent back as a query parameter.
Take the authorisation grant and combine it with the client secret. Then serialise the data into an HTTP data structure. Take special care to match the POST data type from the documentation:
- Form Data
- Multipart Form
Step 5: Send the token grant request and receive tokens
If everything has been configured correctly, the response to the above request will usually be a JSON object with an access token, refresh token and an indication of the expiry.
Step 6: Store the token. Then use it to authorise every request
Access tokens (also called Bearer tokens) need to be in the Authorisation header for each data request. Use the following interpolated string to authenticate each user request: “Bearer <token>”.
Make sure to store the tokens in a secure place within you app and never ever expose them publicly to the user. Consider using a secrets manager to help keep them secure.
Insights from building SaaS marketplace integrations
As you can see from the discussion above, authentication and authorisation are involved processes that seem to vary just enough to be out of reach of generalisation.
Next Steps
We’ve arrived at the proverbial starting line for successfully building out B2B SaaS marketplace integrations
So, in our next article we will work through what needs to be done to start transacting data. We will discuss the types of background process, UI changes and other considerations we need to think of to successfully build out B2B SaaS marketplace integrations.