
Verify clients from Xero Practice Manager
Run compliance from inside Xero Practice Manager. Checks start from a record and the result lands back on the client.
Also listed under Accounting
Xero Practice Manager helps you run your practice smoothly! Manage jobs, track time, invoice clients, and streamline.
Description supplied by Xero Practice Manager.
What starts a check from Xero Practice Manager
You do not open StackGo. A change in the system starts the work, and the system stays your source of truth.
ID and selfie
- Start it
-
KYC Commandtick it - Comes back
- KYC Status, Verification Link
Usually your compliance form, then ID and selfie, then your risk assessment
- Start it
-
AML Commandtick it - Comes back
- AML Status, Risk Rating, RA Completed Date and By, Risk Assessment Link
The AML check needs AML checks switched on in XPM Settings. Contacts on the client with an email address get their own check. How the risk assessment works · Australia’s Tranche 2 rules
What StackGo puts back on the record
Custom fields StackGo creates on your XPM clients when you connect. The AML fields are added only when you switch AML checks on. Results arrive within minutes of the check completing. What goes back to your CRM by default.
| Field | What it holds |
|---|---|
| KYC Command Outcome | The checkbox that starts a check. Unticked again once the check link is sent |
| KYC Status Outcome | Started, then Positive, Negative, Resubmission required, Expired or Review |
| Verification Link Outcome | A link to the check in StackGo, behind your login |
| AML Status Outcome | AML check only: Started, then Awaiting risk assessment, then Completed, Failed or In Progress |
| Risk Rating Outcome | AML check only: the assessed risk rating |
| RA Completed Date and RA Completed By Outcome | AML check only: when the risk assessment was completed, and by whom |
| Risk Assessment Link Outcome | AML check only: a link to the risk assessment in StackGo |
- Outcome Carries no identity data. Safe anywhere your team already works.
A native connector, set up once
Tick KYC Command on the client to start a check; the result is written back to its custom fields.
Connect Xero Practice Manager once from StackGo
A one-off set-up, done once by an admin before your first check. StackGo creates the custom fields it needs on your clients.
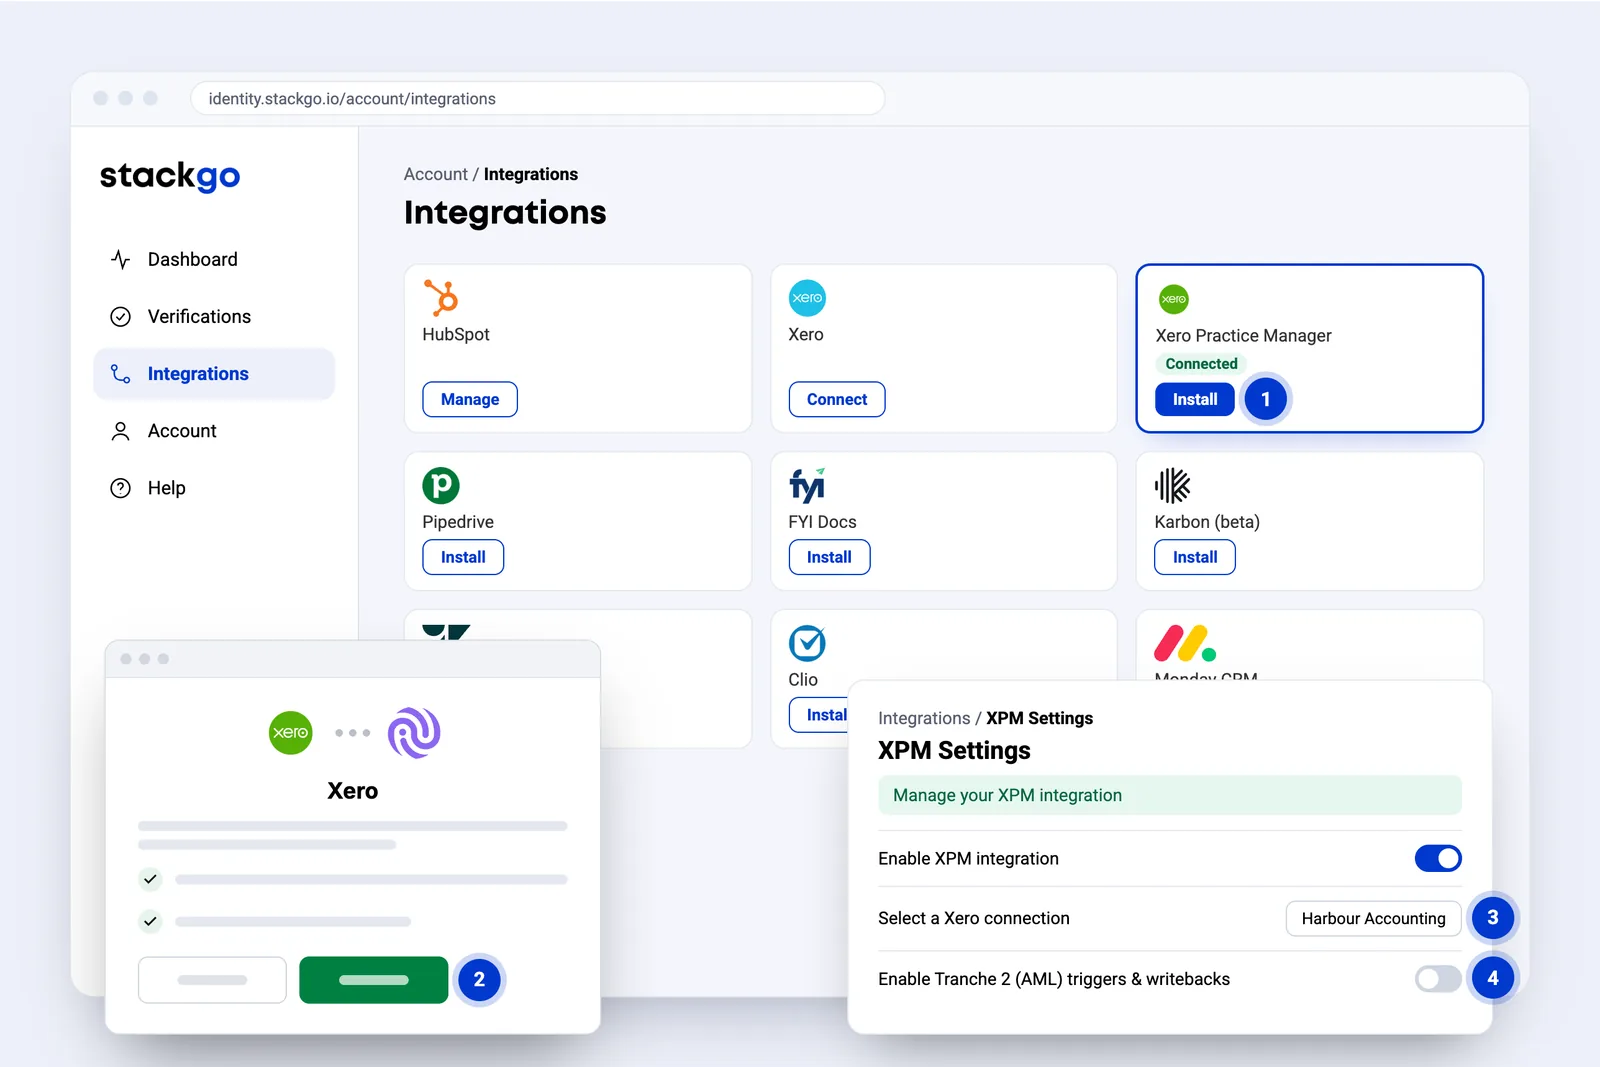
- Install on the Xero Practice Manager card starts the connection.
- Xero opens to sign in and allow access. Only when you install. StackGo never sees your password.
- Select a Xero connection and save. StackGo creates KYC Command, KYC Status and Verification Link in XPM.
- Switch on AML checks to add AML Command, AML Status and the risk assessment fields.
From a client in Xero Practice Manager to a verified client
Once XPM is connected, your team ticks one box. StackGo emails the client on its next hourly sync, the client verifies on their phone, and the result comes back to the same client in XPM.
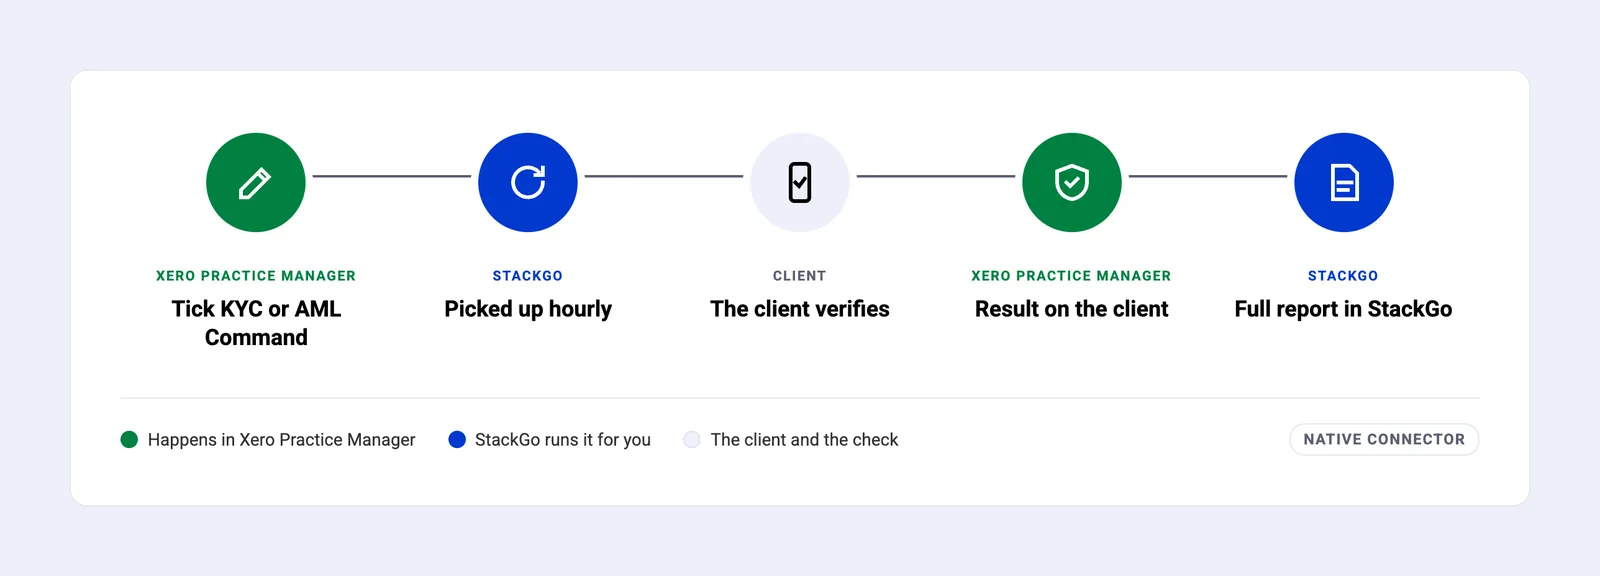
- Tick KYC or AML Command. Edit the client in Xero Practice Manager, tick one and save.
- Picked up hourly. StackGo’s sync emails the check link and sets the status to Started.
- The client verifies. For an AML check, usually your compliance form first. Then ID photo and selfie on their phone.
- Result on the client. KYC Status and the Verification Link are written to the client’s custom fields.
- Full report in StackGo. Document, images and a timeline of the check, with a PDF for your records.
Tick KYC Command or AML Command on the client
Tick KYC Command for a KYC check, or AML Command for an AML check. Contacts on the client with an email address get their own check too.
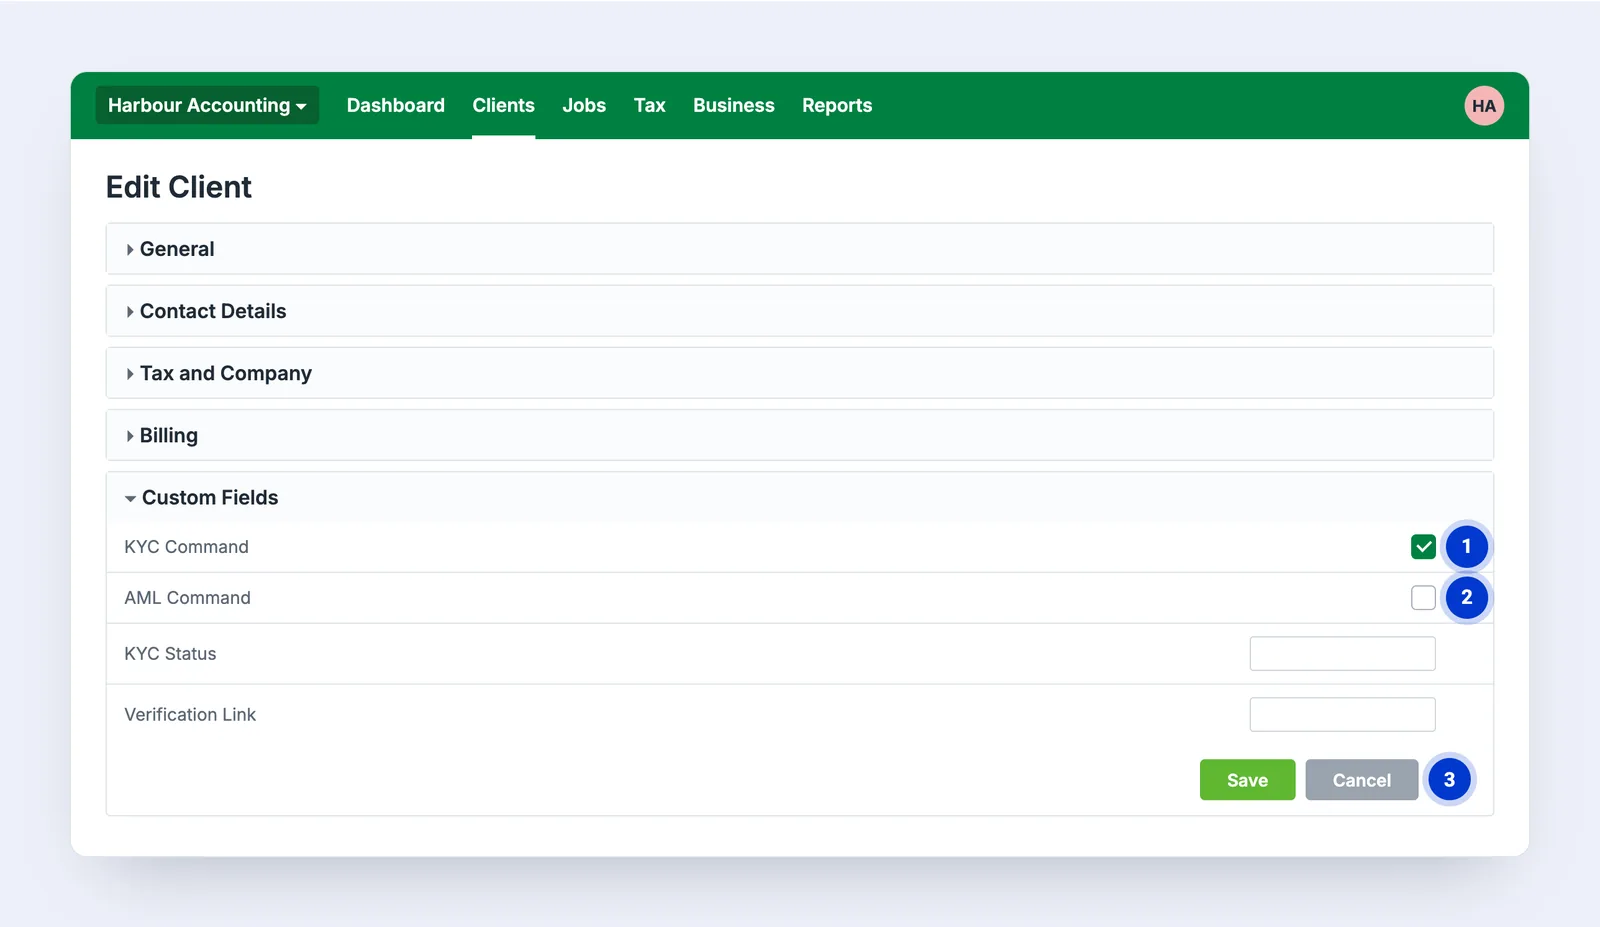
- Tick KYC Command for a KYC check: ID and selfie.
- Or tick AML Command for an AML check: usually your compliance form, then ID and selfie, then your risk assessment.
- Save. StackGo picks it up on its hourly sync, sends the check link, unticks the command and sets the status to Started.
On the client’s phone, in a few minutes
Everything happens on the client’s own phone, from the email StackGo sends. For an AML check, your compliance form usually comes first.
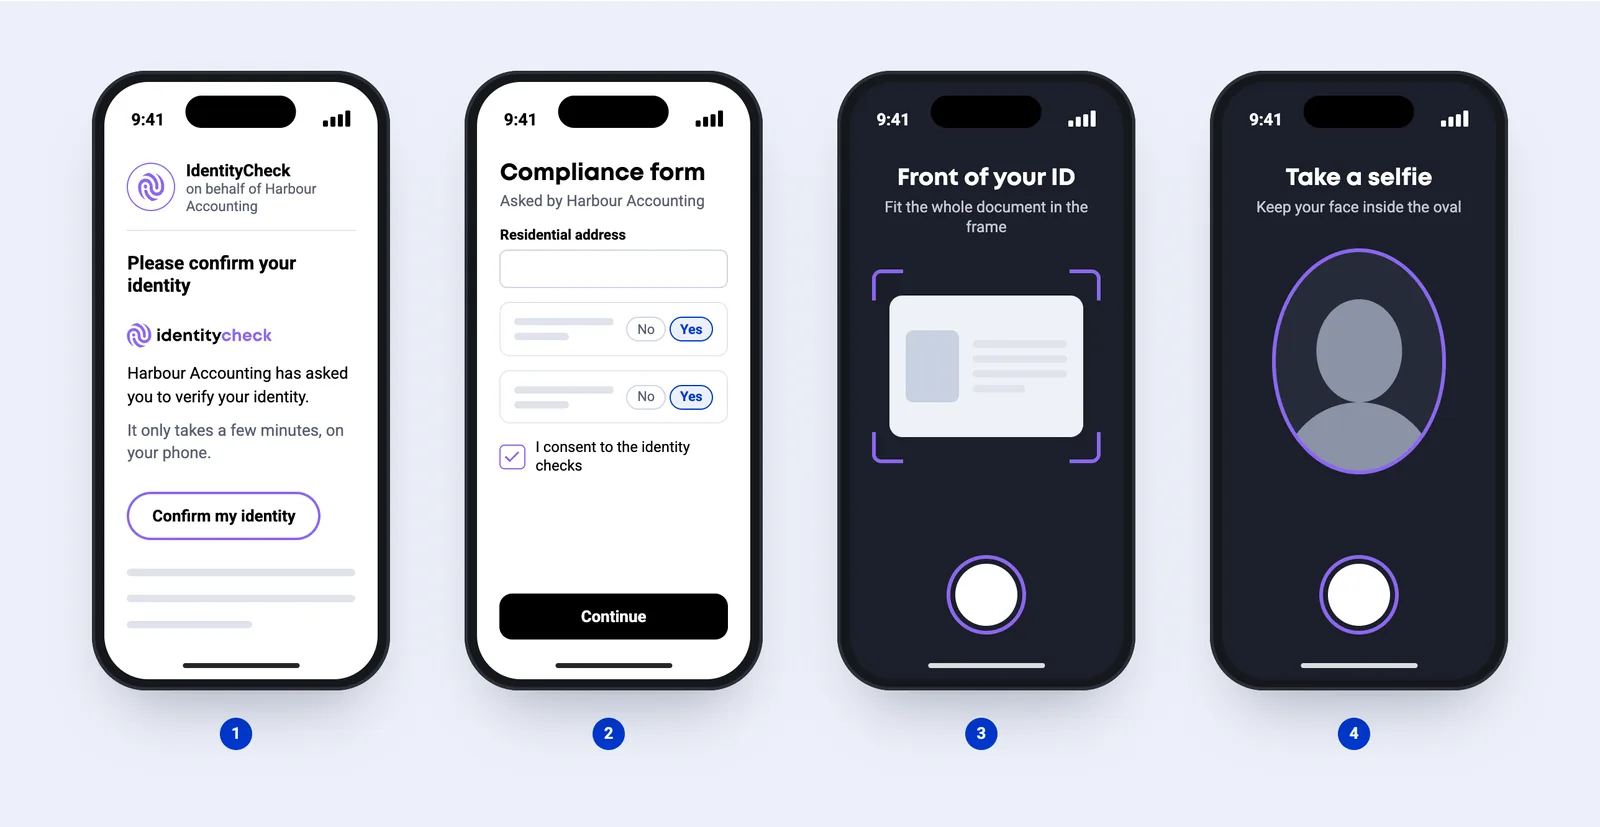
- Open the link. An email from IdentityCheck, sent on behalf of your business.
- A compliance form. For an AML check, usually your compliance form comes first. For a KYC check, only if you have set one up.
- Photograph the ID. Passport, driver licence or national ID card.
- Take a selfie. A quick photo to match their face to the ID.
The result lands on the XPM client
The result lands in the client’s custom fields within minutes of the check completing.
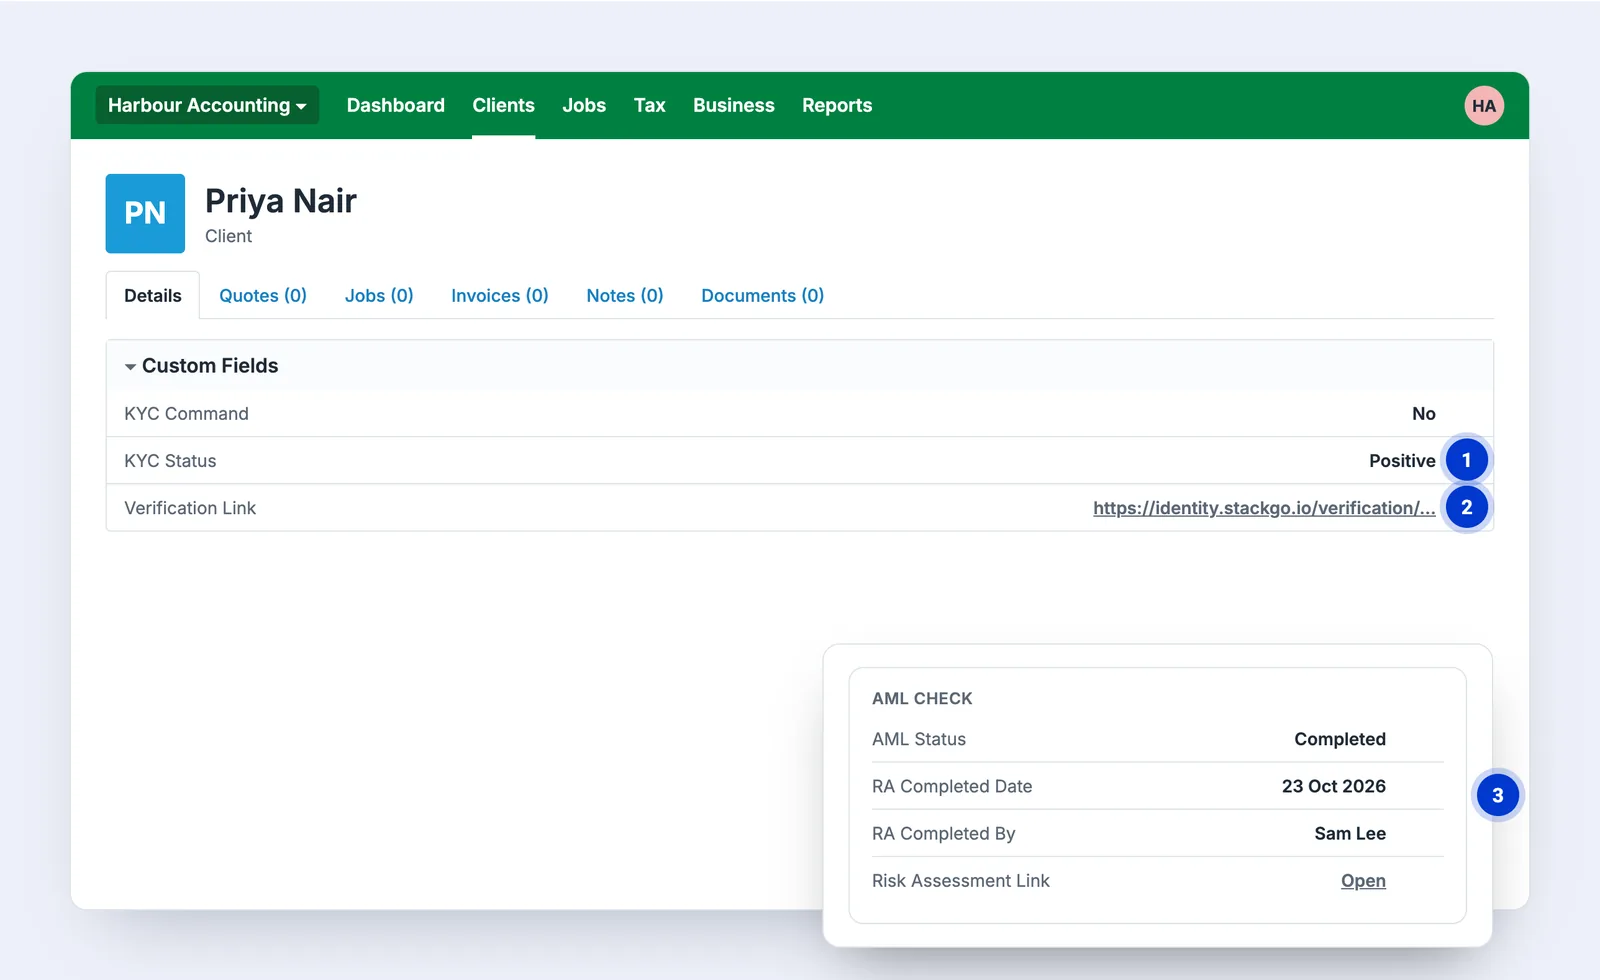
- KYC Status shows the result: Positive, Negative, Resubmission required, Expired or Review.
- Verification Link opens the check in StackGo.
- For an AML check, AML Status, the risk rating, the risk assessment link and who completed it are written too.
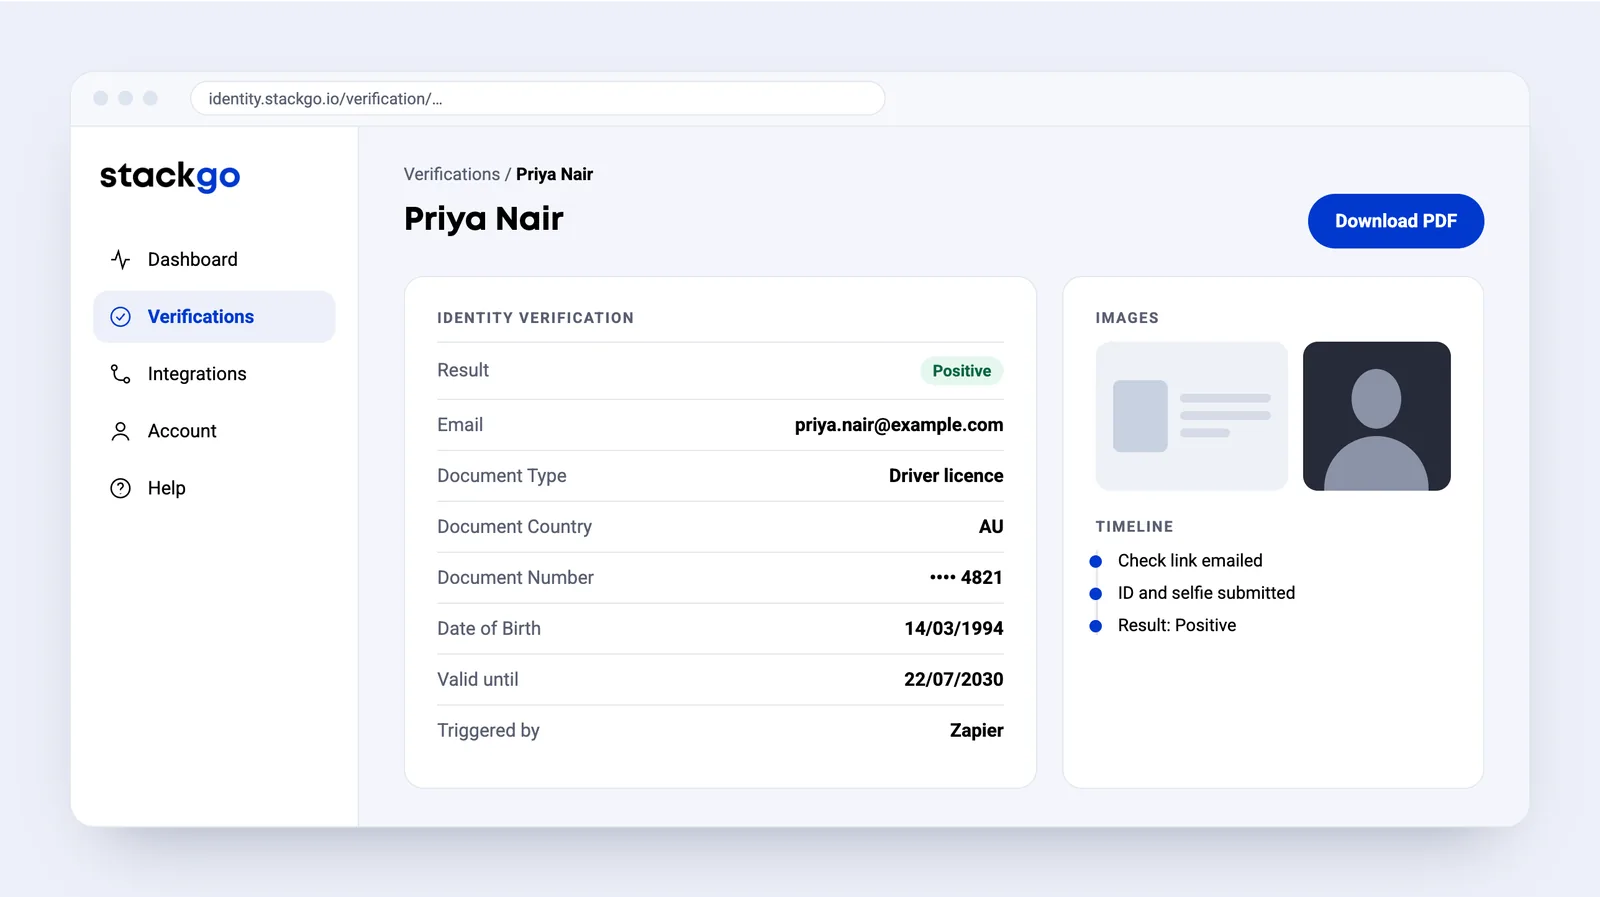
The result and the full report in StackGo
The report records the document, date of birth, ID and selfie images, and a timeline of the check. Download it as a PDF for your records.
Common questions about Xero Practice Manager
How does StackGo connect to Xero Practice Manager?
Natively. An admin clicks Install on the Xero Practice Manager card under Integrations in StackGo, signs in to Xero, selects the Xero connection and saves. StackGo then creates the KYC Command, KYC Status and Verification Link custom fields in XPM.
How do I start a check from XPM?
Tick KYC Command on the client for a KYC check, or AML Command for an AML check: usually your compliance form, then the ID check, then your risk assessment. StackGo checks XPM every hour, so the check link goes out on the next sync, and the command is unticked again. Contacts on the client with an email address get their own check.
What is written back to XPM?
KYC Status is set to Positive, Negative, Resubmission required, Expired or Review, and Verification Link opens the check in StackGo. For an AML check, AML Status, Risk Rating, RA Completed Date, RA Completed By and Risk Assessment Link are written too.
What does the client have to do?
Open the email from IdentityCheck on their phone, answer a short form if you have set one up, photograph their ID and take a selfie.
How does my team find out the result?
StackGo emails the Notification Email set under Account, Notifications, with the result in the subject line and a link to the full report. The PDF report can be attached if you ask us to turn it on.








Ready to make onboarding minutes, not hours?
Start free and run your first check today, or book a demo and we will walk you through it.