
Getting Xero client onboarding right means more than just sending login credentials. It’s the process that sets the tone for your entire client relationship, from the initial engagement letter through to a fully configured Xero organisation with bank feeds, chart of accounts, and user permissions sorted. Get it wrong, and you’re chasing documents, fixing data entry mistakes, and fielding avoidable support requests for months. Get it right, and your practice runs smoother from day one.
Most accountants and bookkeepers already know what good onboarding looks like in theory. The challenge is turning that into a repeatable process that doesn’t fall apart when you’re juggling 15 new clients in a quarter. That’s especially true when compliance steps like identity verification sit outside your core tools, forcing you to switch between platforms and manually track what’s been completed.
At StackGo, we build integrations that bring tasks like KYC and identity verification directly into the software you already use, so compliance doesn’t become a bottleneck during onboarding. This guide walks you through a practical, step-by-step Xero client onboarding process, covering the administrative groundwork, the technical setup inside Xero, and where to streamline the compliance steps that too often slow everything down.
What Xero client onboarding covers
Xero client onboarding isn’t a single task. It’s a sequence of steps that spans two distinct layers: the administrative groundwork and the technical configuration inside Xero itself. Understanding what falls under each layer helps you build a checklist that nothing slips through, and it makes it easier to delegate steps to junior staff or systematise parts of the process over time.
The administrative layer
Before you touch Xero, you need the paperwork sorted. This includes engagement letters, conflict-of-interest checks, and identity verification under your TPB obligations or, for larger practices, AUSTRAC’s incoming AML/CTF requirements for accounting firms. Missing any of these steps at the start creates compliance gaps that are hard to close later.
Getting identity verification done before technical setup means you’re never configuring a client’s file only to discover they haven’t passed a KYC check.
The administrative layer also covers fee agreements, direct debit authorities if you use practice management software for billing, and confirming the scope of work in writing. These steps protect both you and your client, and they’re far easier to complete upfront than to chase retrospectively.
The technical setup layer
Once the admin is done, the technical side begins. This includes creating the Xero organisation (or being invited to an existing one), configuring the chart of accounts, setting up bank feeds, adjusting GST and BAS settings, and assigning user roles and permissions. Each of these steps needs to happen in the right order, or you end up reworking settings after the fact.
Covering app integrations, data migration from a prior system, and a handover session so the client understands how to use Xero day-to-day also falls into this layer. Both layers are covered in the steps below.
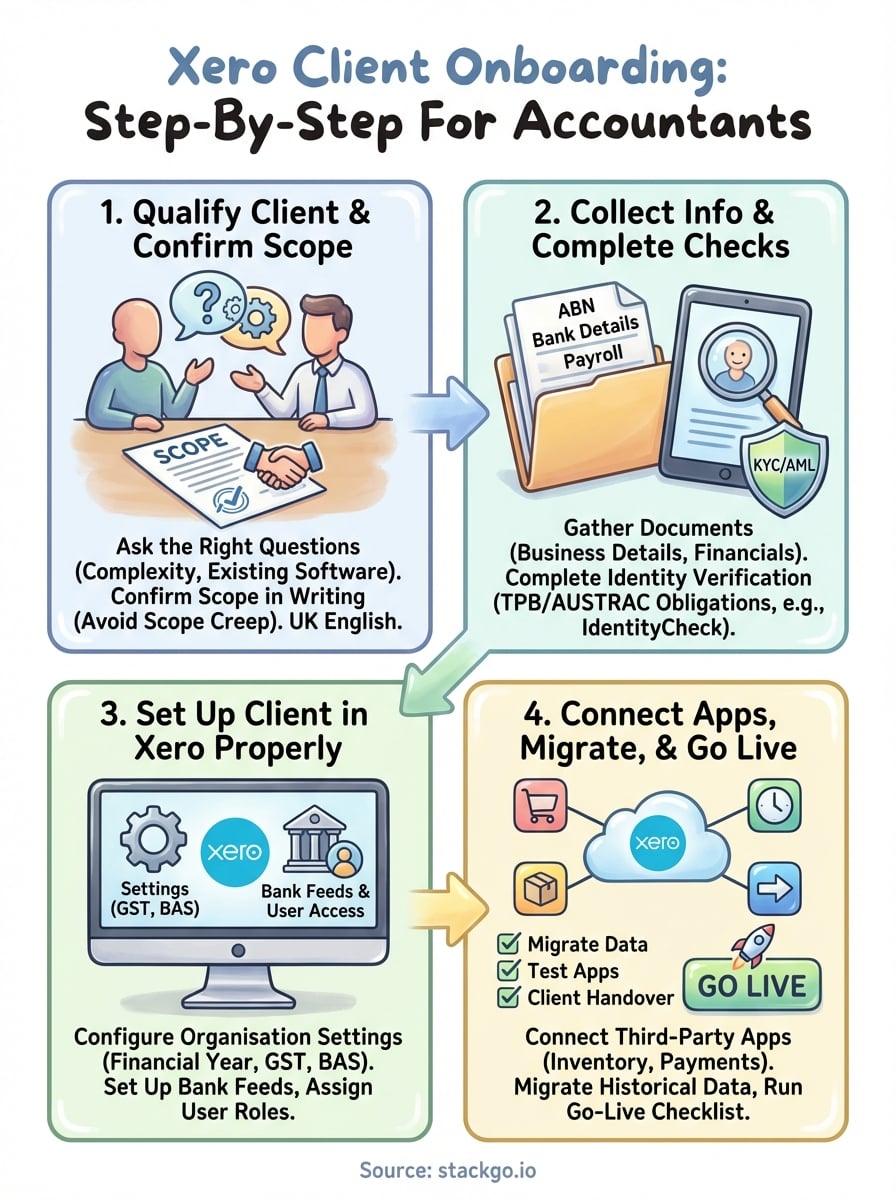
Step 1. Qualify the client and confirm scope
Before you open Xero or send a single form, qualifying the client protects your practice from scope creep and mismatched expectations. This step is about confirming the client is a good fit, understanding their current setup, and agreeing in writing on exactly what you will and won’t deliver before the engagement begins.
Ask the right questions upfront
A short discovery call or structured intake form covers the ground you need. The key areas to probe are the complexity of the business (entities, payroll headcount, transaction volume) and their existing software (migrating from MYOB, working from spreadsheets, or starting from scratch). Their answers directly shape how long the Xero client onboarding process will take and what it should cost.
Confirm scope in writing before any technical setup begins – vague agreements lead to unpaid extra work later.
Use this as a quick scope checklist before moving forward:
- Entity type and number of Xero organisations required
- Current accounting software and whether data migration is needed
- Payroll requirements including employee count and pay schedules
- GST registration status and BAS lodgement frequency
- Third-party app requirements such as inventory, payments, or time tracking
Step 2. Collect info and complete checks
Once scope is confirmed, you need to gather the documents and data required before the technical Xero client onboarding work begins. Collecting everything in one pass saves you from chasing clients across multiple emails later.
Gather the documents you need
Send a structured request list so the client knows exactly what to provide. The core items to collect are:
- Business registration details: ABN, ACN, entity name and structure
- Prior year financial statements or trial balance for migration
- Bank account details for setting up feeds
- Payroll records if you’re taking over payroll processing
- Existing software login credentials or data export files if migrating
Sending a single, complete document request upfront is faster than following up three times for individual items.
Complete identity verification
Before you finalise the engagement, verifying the client’s identity is a legal requirement under TPB obligations, and increasingly under AUSTRAC’s AML/CTF framework for accounting firms. This step needs to happen before you configure anything in Xero.

Tools like StackGo’s IdentityCheck let you run KYC checks directly from your CRM, so you’re not switching tabs or manually recording outcomes. Verification results write back automatically, keeping your records clean and audit-ready without adding friction to the process.
Step 3. Set up the client in Xero properly
With documents collected and identity verified, you’re ready to build the client’s Xero organisation. Xero client onboarding at this stage is about configuration accuracy – the settings you choose now affect everything from BAS calculations to payroll compliance, so working carefully through each step is worth the time.
Configure the organisation settings
Start by creating a new Xero organisation or accepting an invite to an existing one. Set the financial year start date, GST registration status, and BAS lodgement frequency under Accounting > Advanced > Financial Settings. Getting these wrong means fixing lodgements later, which costs time you don’t have.
Set the chart of accounts before entering any transactions – changing account codes after data is entered creates reconciliation problems that are hard to untangle.
Set up bank feeds and user access
Connect bank feeds by navigating to Accounting > Bank Accounts and selecting the client’s financial institution. Most Australian banks connect directly through Xero’s open banking integration. Once feeds are active, assign user roles and permissions to match what the client actually needs. Most clients only require the Standard or Adviser role – handing out full admin access by default creates unnecessary risk.

Step 4. Connect apps, migrate, and go live
The final phase of Xero client onboarding brings everything together. Once your organisation settings are locked in, you connect the apps the client relies on, move across any historical data, and confirm the file is ready for day-to-day use.
Connect third-party apps
Navigate to the Xero App Store and connect any integrations the client needs, such as inventory management, payment processing, or job tracking tools. Install each app using the client’s credentials, not your own practice login, and test the connection before going live.
Confirm that data flowing between connected apps maps correctly to the right Xero accounts before the client starts processing transactions.
Migrate historical data and confirm go-live
If the client is migrating from another system, import the opening trial balance under Accounting > Advanced > Manual Journals using the agreed conversion date. Check that bank account opening balances match the prior system, and reconcile any differences before handing over.
Run through this go-live checklist with the client before closing out the onboarding:
- Opening balances entered and confirmed
- Bank feeds active and pulling transactions
- Connected apps tested and mapping correctly
- Client walkthrough completed and questions answered
Next steps
A structured Xero client onboarding process saves your practice from document-chasing, configuration errors, and compliance gaps that build up when you work without a consistent system. The four steps above give you a clear path from initial qualification through to a live, connected Xero file that your client can actually use from day one.
The compliance layer is where most practices lose the most time. Identity verification and KYC checks are non-negotiable under TPB obligations, and the incoming AUSTRAC AML/CTF obligations for accounting firms make that more pressing. Running those checks from within your existing CRM, rather than switching to a standalone tool, keeps the process moving without adding extra manual steps for your team.
If you want to see how that looks in practice, start a free IdentityCheck account and run a verification directly from your existing software. No complex setup, no new platform to learn.


